| |
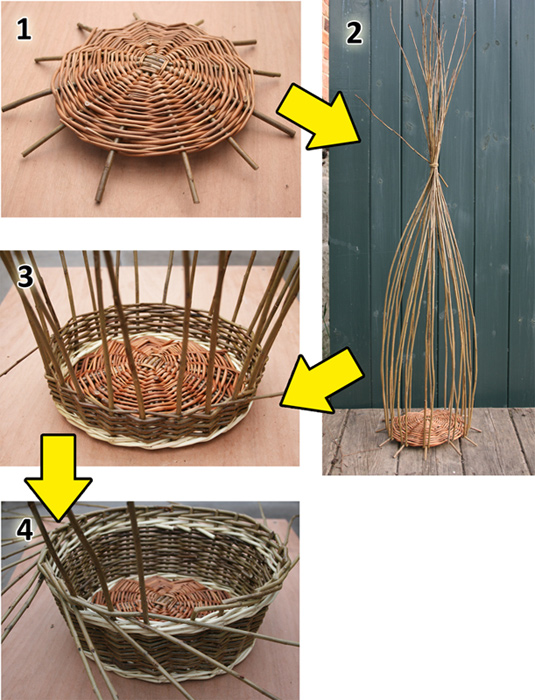
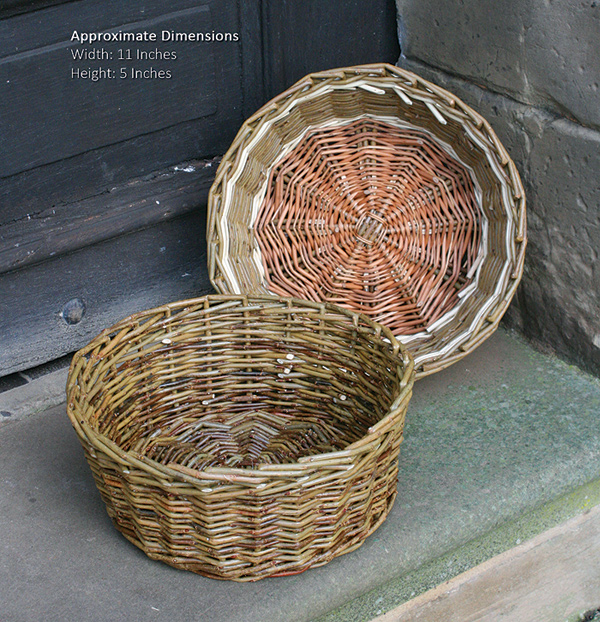
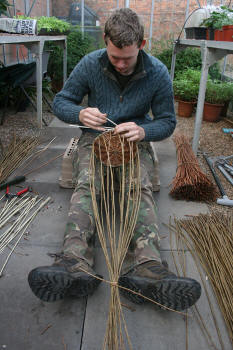
Stage 1 - The
Base |
|
|
|
| |
|
|
|
|
| |
|
|
|
|
| |
 |
|
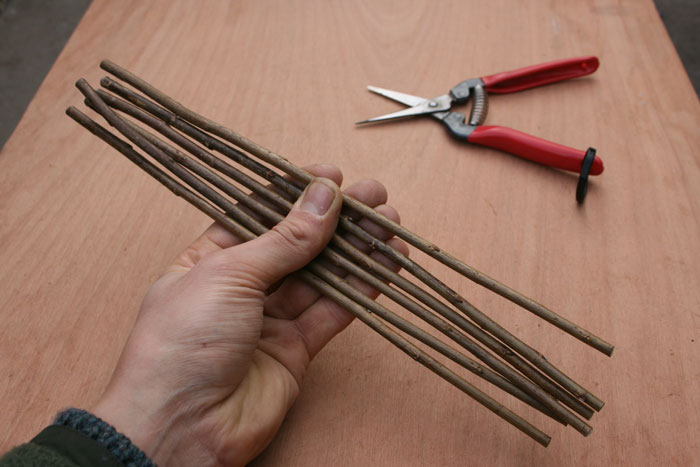
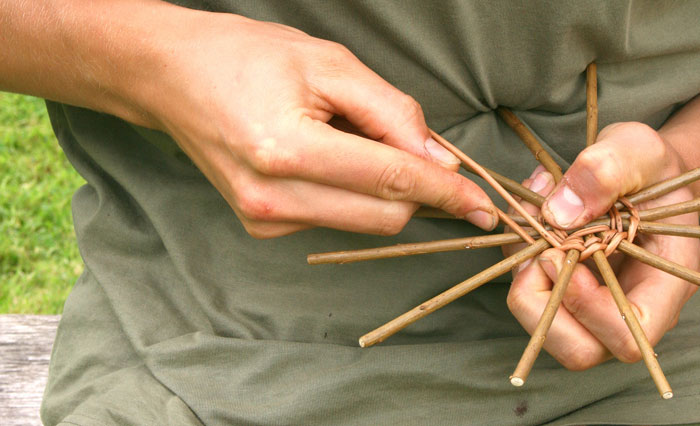
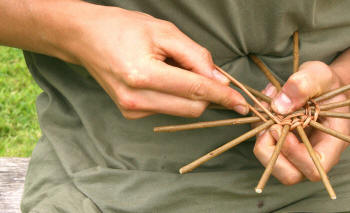
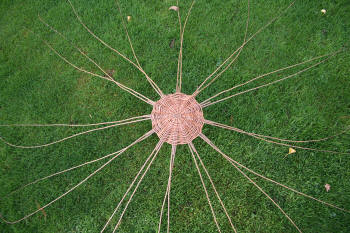
Making the
‘slath’:
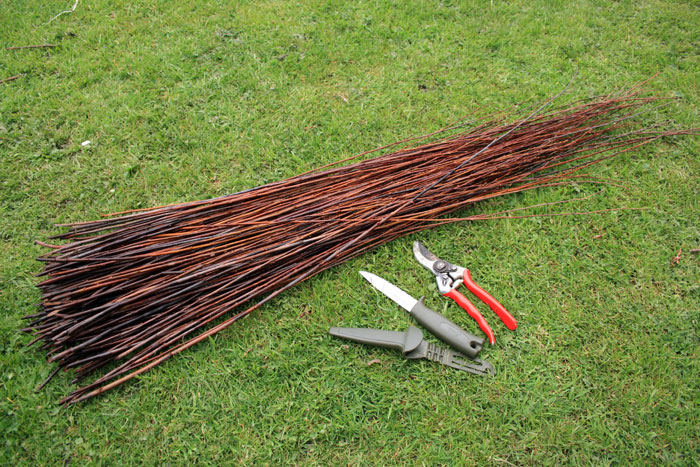
Take the six thickest rods for the
‘base sticks’. From the butt end of each, cut a length 12"
(30cm) long.
|
|
| |
|
|
|
|
| |
 |
|
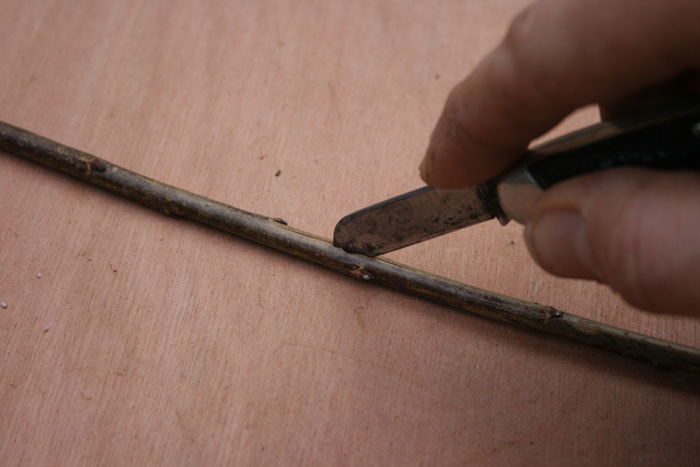
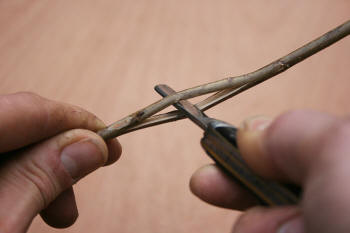
Half of these sticks need to be split at
their centre using a knife. |
|
| |
|
|
|
|
| |
 |
|
Working
onto a surface, push the knife into the stick as central as
possible. Then pick the stick up and push the blade through. Now
turn the knife to open out the split, which needs to be about 2"
(5cm) long. |
|
| |
|
|
|
|
| |
 |
|
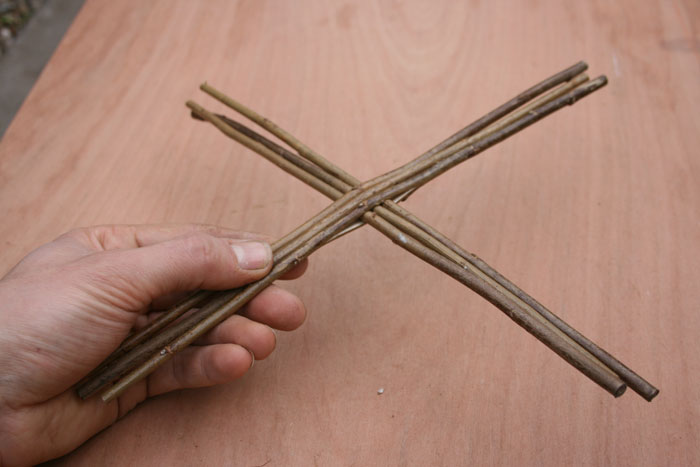
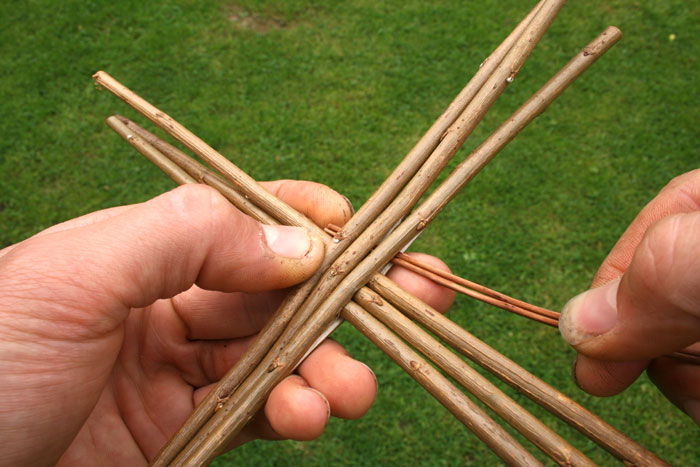
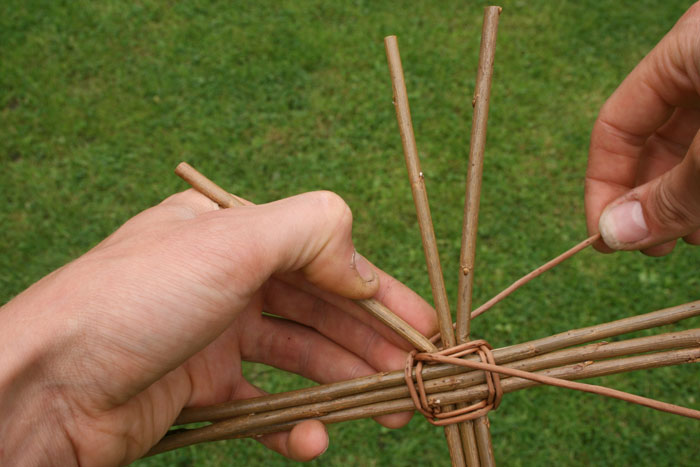
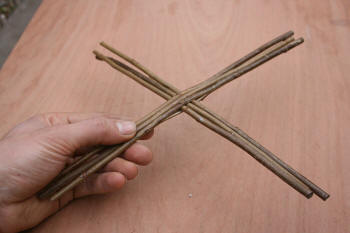
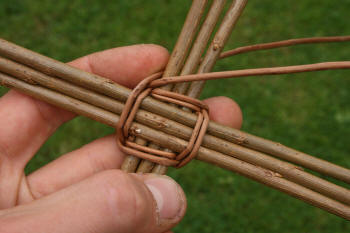
The
non-split sticks are now threaded through the centres of the split
sticks to form a cross called a ‘slath’. This is most easily done by
first threading the three split sticks onto one non-split stick,
then simply push the other two through into place. Note, it can be a
good idea to alternate the thick and thin ends to keep things
balanced. |
|
| |
|
|
|
|
| |
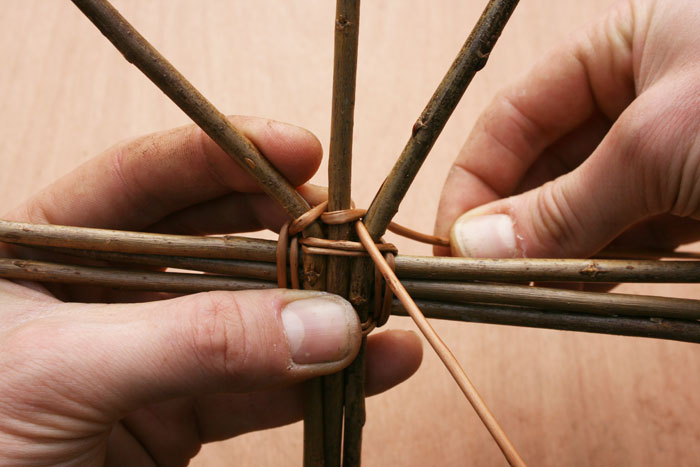
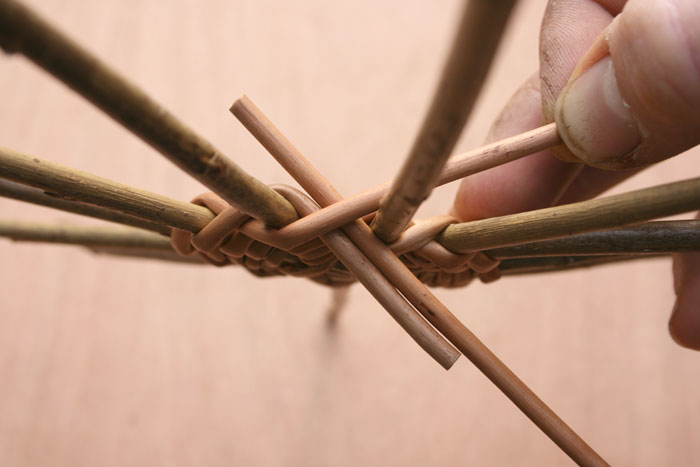
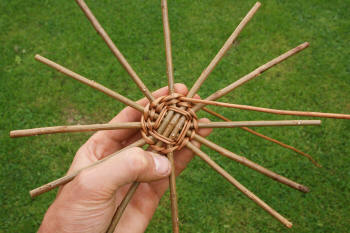
Weaving the base: The base is woven
with a ‘pairing’ weave. To begin, you’ll be weaving clockwise around
each of the four ‘arms’ of the slath to hold it tightly together. |
|
| |
|
|
|
|
| |
 |
|
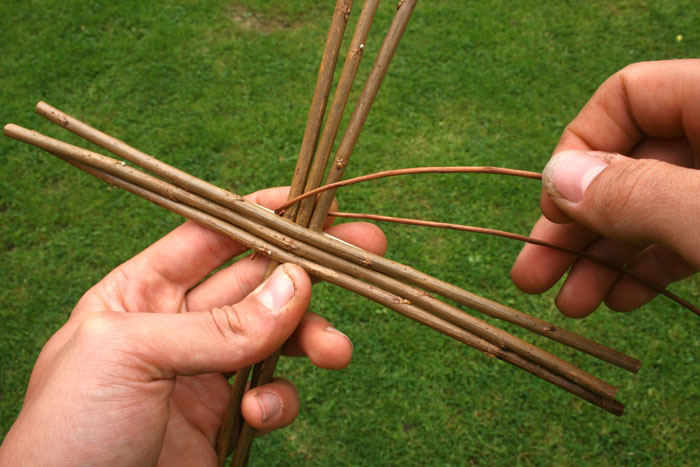
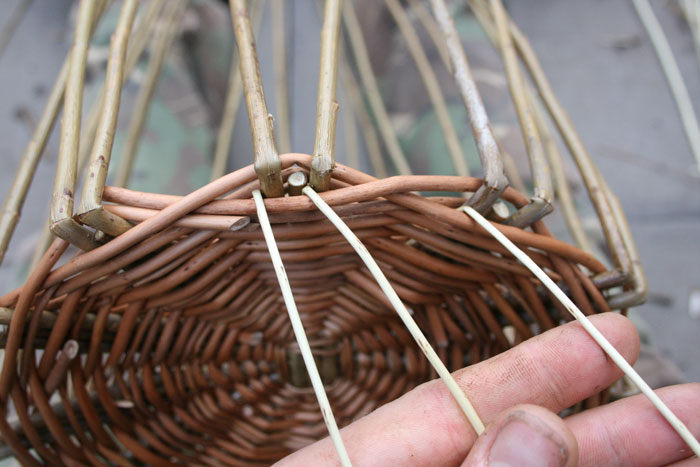
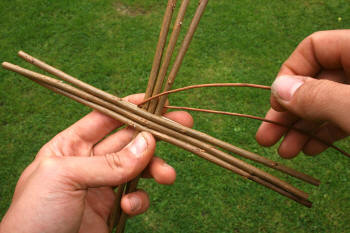
Select your two thinnest longest
rods to use as weavers. You’ll Start with their tip ends
(the thinner ends). Trim a couple of inches off if they are
damaged or very wispy.
Insert the tips into the split of the slath as shown. |
|
| |
 |
|
|
|
| |
 |
|
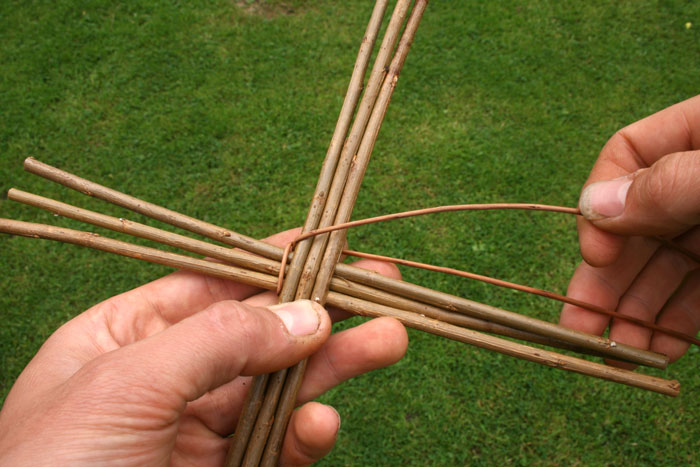
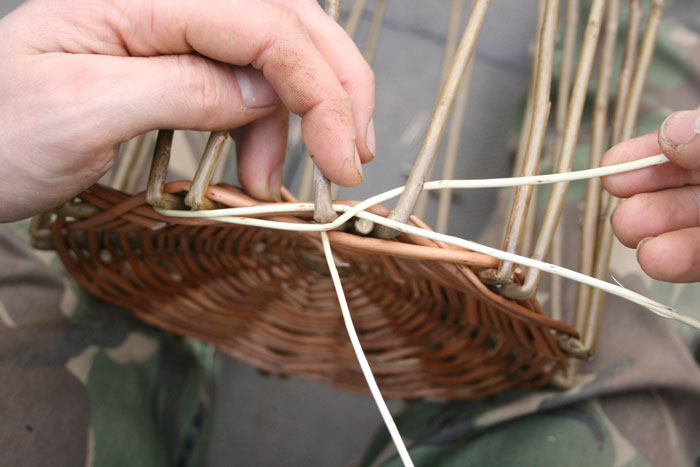
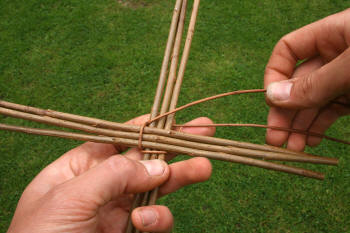
Then, position the weavers so that
the next arm of the slath is between them, as shown.
Now, bring the weaver from the back up and over the next
arm, and the top weaver down behind. |
|
| |
|
|
|
|
| |
 |
|
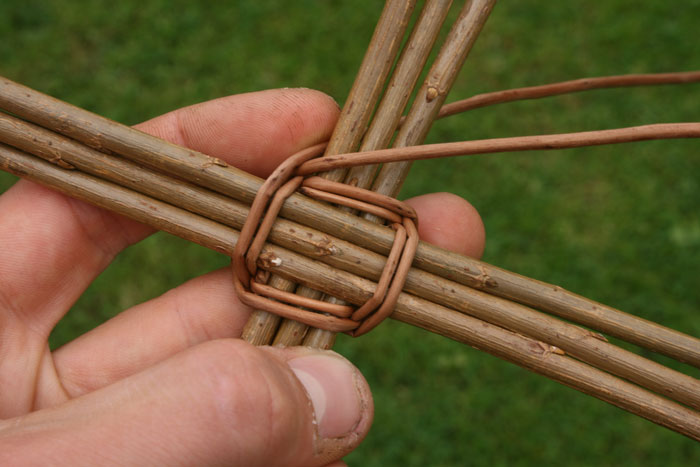
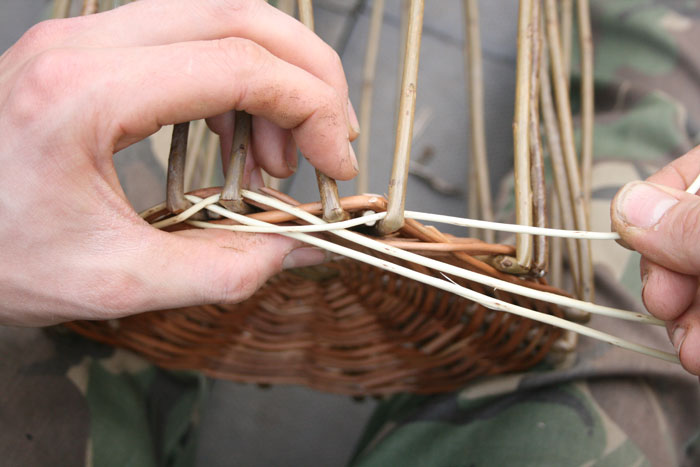
Do the same again around the next
arm, bringing the weaver from the back up and over, and the
top weaver down behind...
Rotate the slath as you go
(anticlockwise) so that the handling is the same with each
stroke. This will help a lot. |
|
| |
|
|
|
|
| |
 |
|
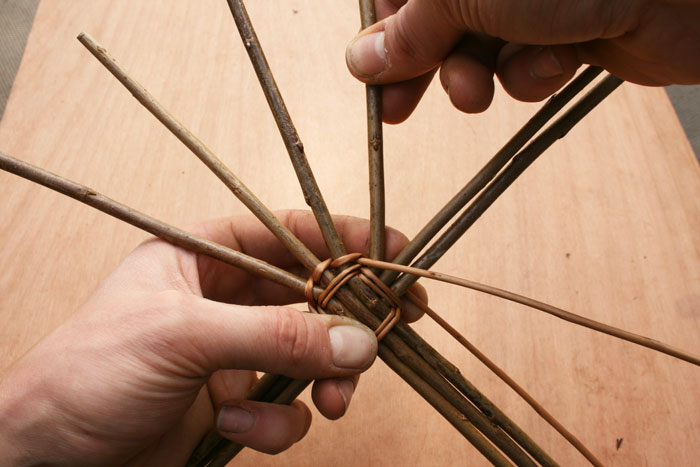
Keep the weavers pulled in tightly
as you go.
Note that when the weaver from the
back comes up, it should come under the weaver resting at
the top, and then the top weaver goes down over it.
You will need to continue in this way until you have
completed two rounds. |
|
| |
|
|
|
|
| |
 |
|
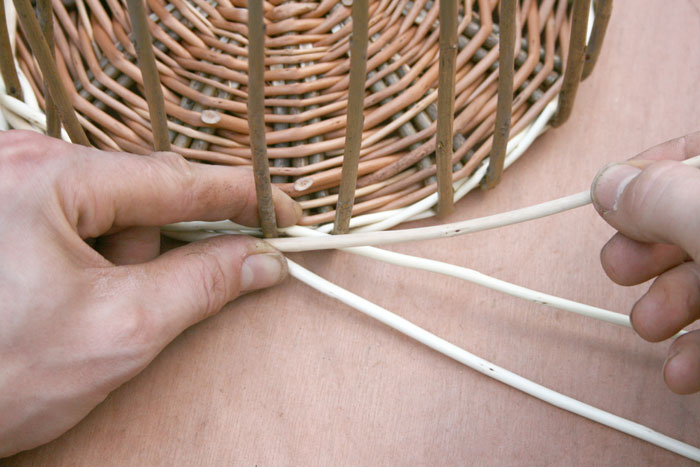
Position the weavers as if you are about to do a third round
as shown. |
|
| |
|
|
|
|
| |
 |
|
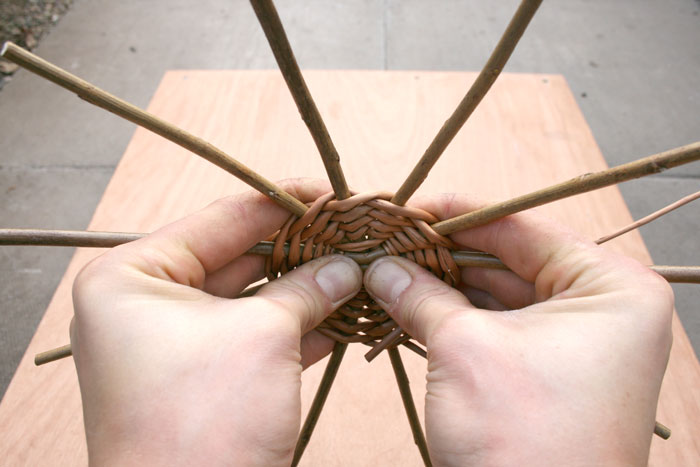
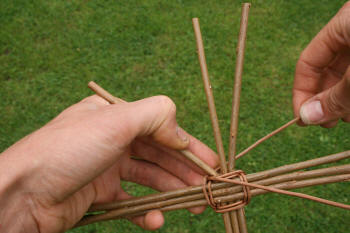
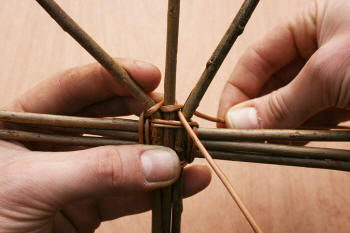
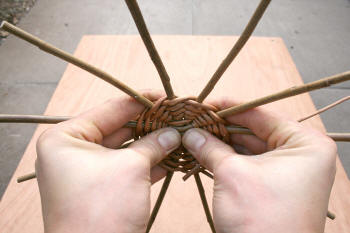
Continue with the same pairing weave, except now you’ll need
to weave between each individual slath stick. Think of each
stick as a separate ‘arm’ like before. Bend each set of
three sticks open as you come to them so they’ll become
spaced like spokes of a wheel. Be firm. |
|
| |
|
|
|
|
| |
 |
|
Pull the weave in as close as possible as
you go.
|
|
| |
|
|
|
|
| |
 |
|
|
|
| |
|
|
|
|
| |
 |
|
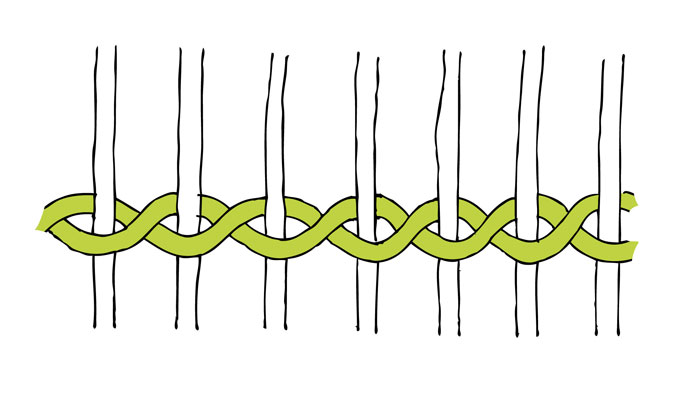
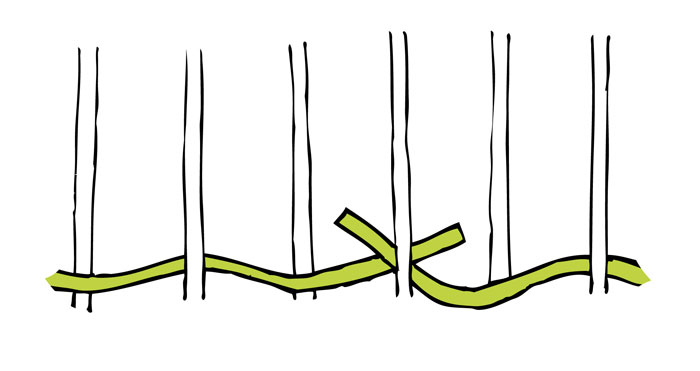
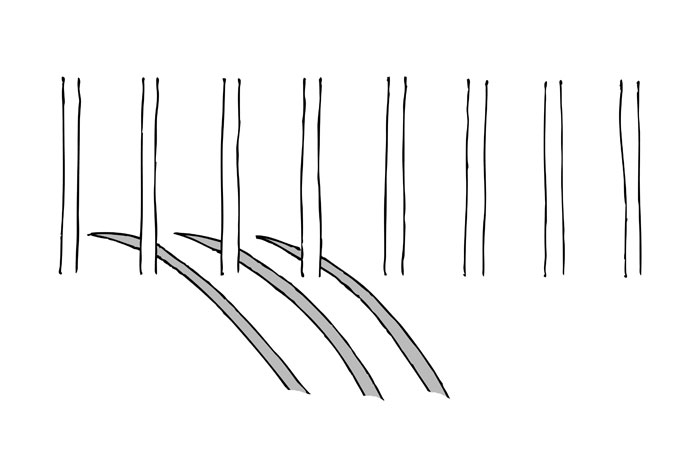
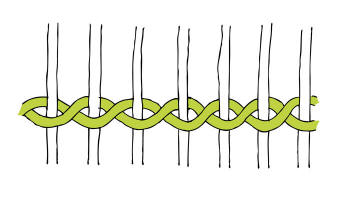
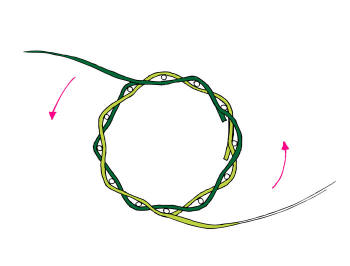
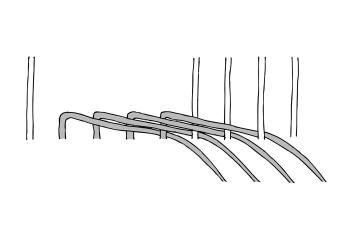
This diagram of a pairing weave woven
around a series of stakes/ spokes should help in understanding how
it should look.
|
|
| |
|
|
|
|
| |
 |
|
|
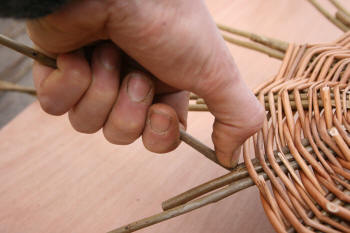
*KEY
TECHNIQUE*
To get a tight weave you must
pull on the weavers firmly with every move. That means, when
bringing a weaver up or down. Once woven, any slack can not
simply be pulled out. Trying to claw at the weave to
eliminate gaps later will also not work. |
|
|
| |
|
|
|
|
| |
 |
|
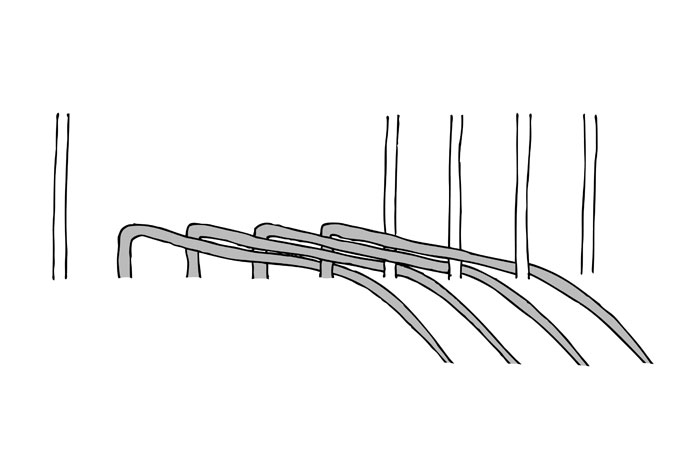
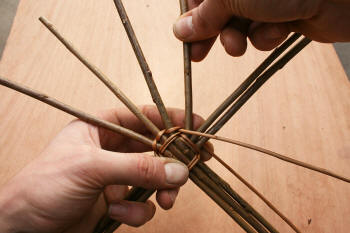
Continue weaving
around and around... |
|
| |
|
|
|
|
| |
 |
|
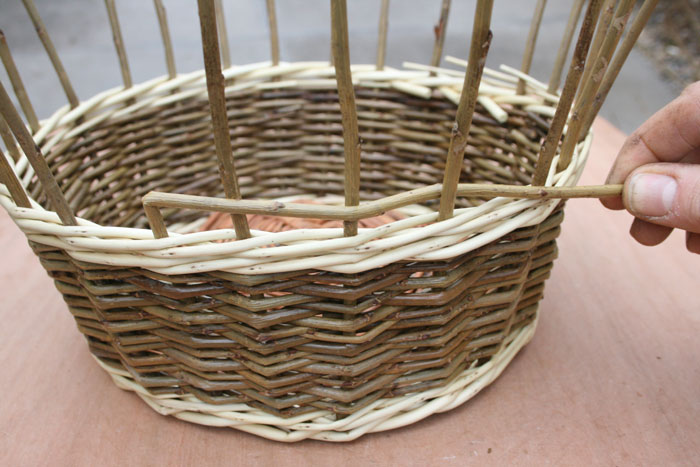
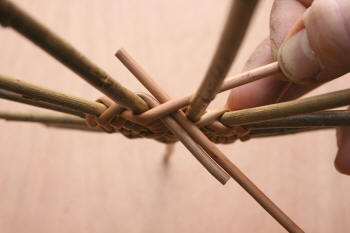
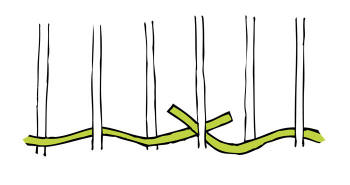
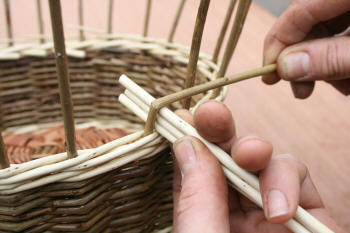
Splice in new
weavers as shown, simply adding a new weaver alongside the old one
and continuing. Butt ends are replaced with butt ends and tips with
tips. After replacing one, weave ahead at least a few moves before
replacing the other. The protruding stubs should be trimmed after
completing the base. Note, you can weave quite far towards the tip
end (the thinner end) of a weaver, leaving only about 4" (10cm)
before replacing it. |
|
| |
|
|
|
|
| |
|
*KEY
TECHNIQUE*
As well as doing
the weave correctly, you need to focus on spacing the spokes
evenly and keeping them level like a disk. To achieve this,
hold the spokes where you want them to be while you weave
around them, thus locking them in position.
|
|
|
| |
|
|
|
|
| |
 |
|
You are aiming
for a base which is either flat or ‘crowned’. Crowned means that the
underside will be slightly concave. Crowning the base makes it
stronger and also gives the basket a rim to sit on.
To do this, when the woven area is
about 3" (7- 8cm) wide, hold and flex it as shown, pushing the
centre in with your thumbs. Turn the base around a little and
repeat. Weave another row or two and then repeat this procedure
again. The crowing can be worked toward or away from you as you
weave. Monitor the shape as you go, you don’t want the crowning to
be too extreme either.
|
|
| |
|
|
| |
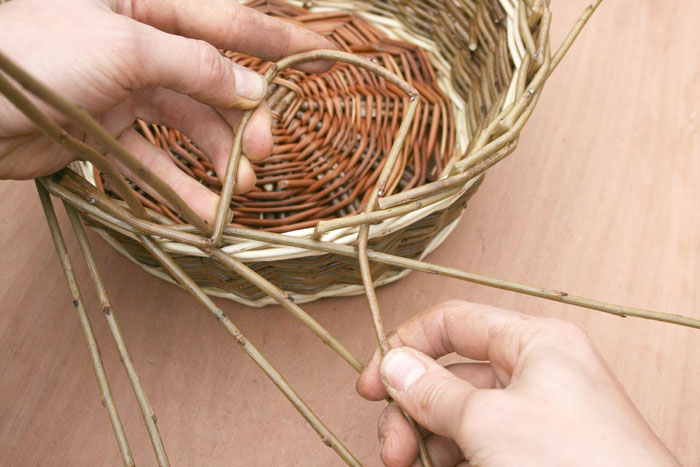
Note: While weaving, if you end up with
one weaver working towards its tip end and the other working towards
its butt, when you replace one of them, add the new weaver in so
that it evens things out. |
|
| |
|
|
|
|
| |
 |
|
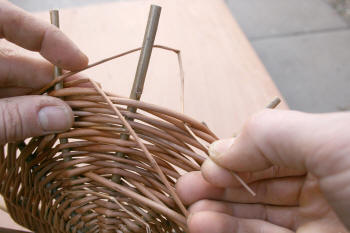
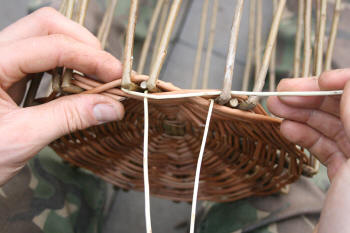
Continue weaving until the base is 8.5"
(22cm) wide. It is preferable to finish with tip ends. Lock them off
with a single move, threading the weaver which would go next,
between the weavers of the previous row. This will keep the other
end held in too. |
|
| |
|
|
|
|
| |
 |
|
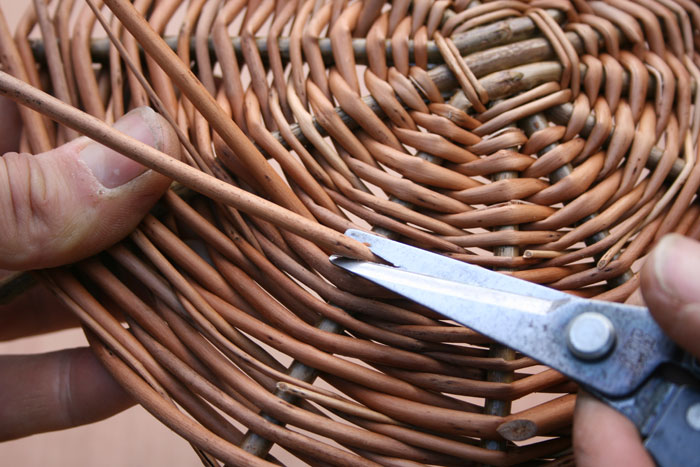
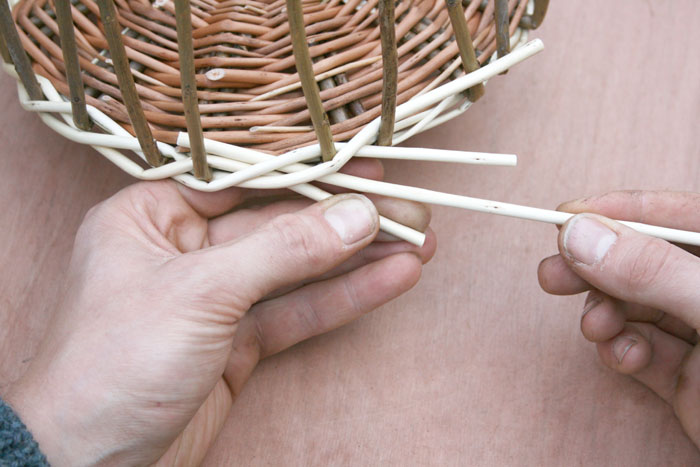
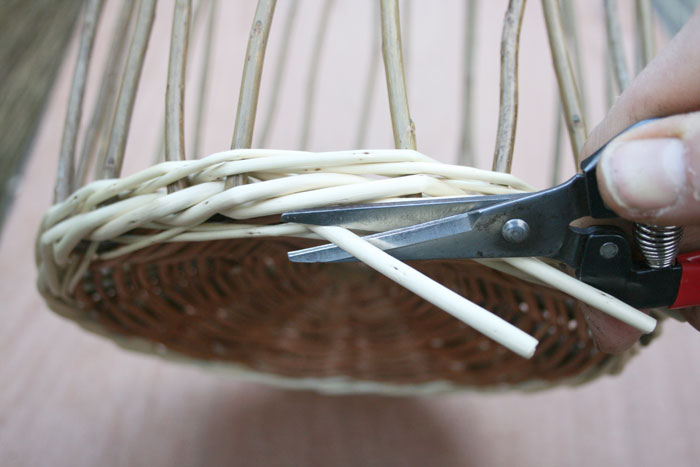
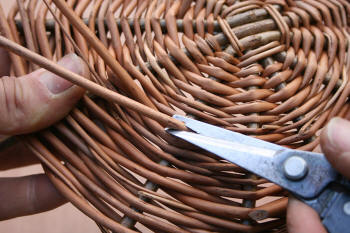
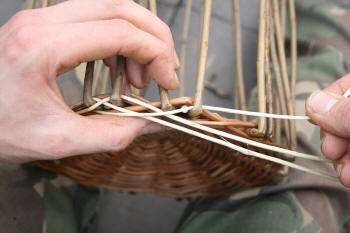
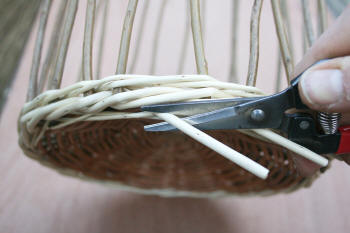
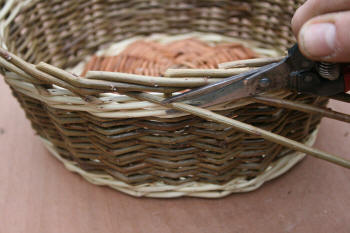
The weaver ends should now be cut off very
close to the weave. However, the ends must still be resting against
a spoke, or have no way of flicking out to the other side of the
base. |
|
| |
|
|
|
|
| |
 |
|
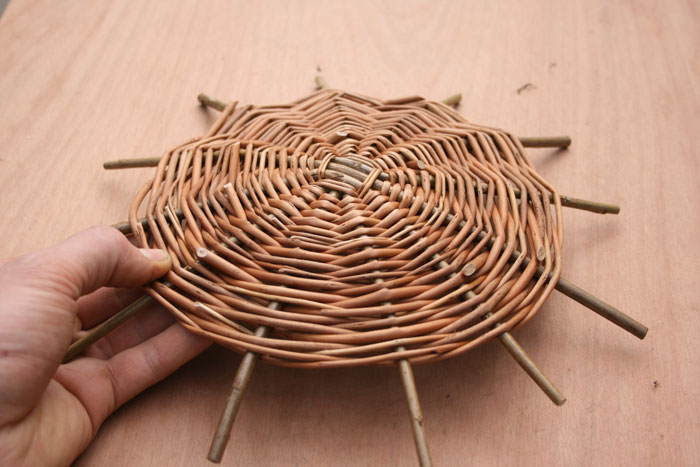
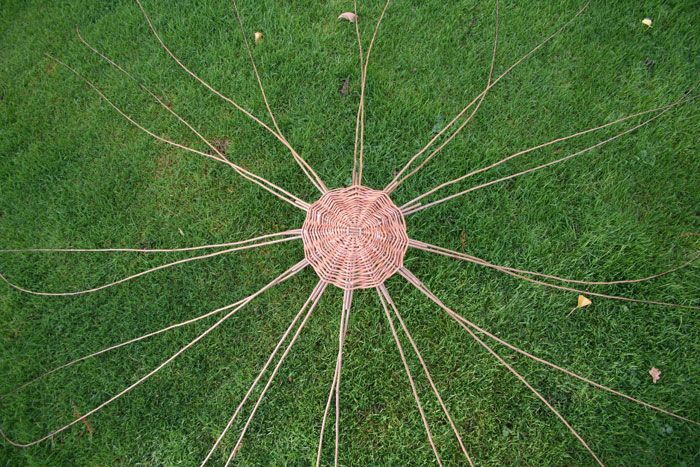
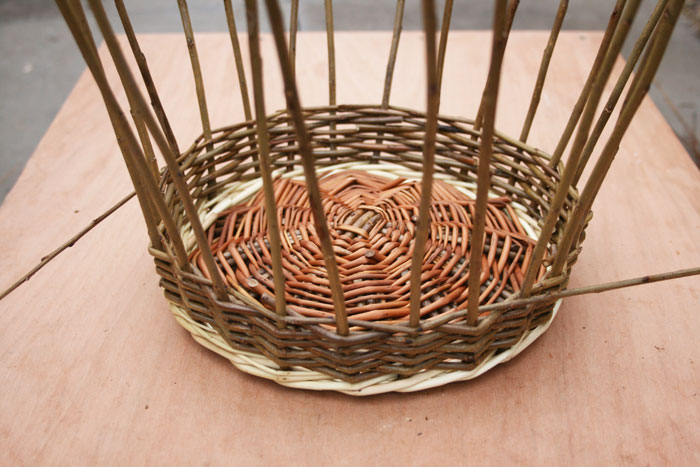
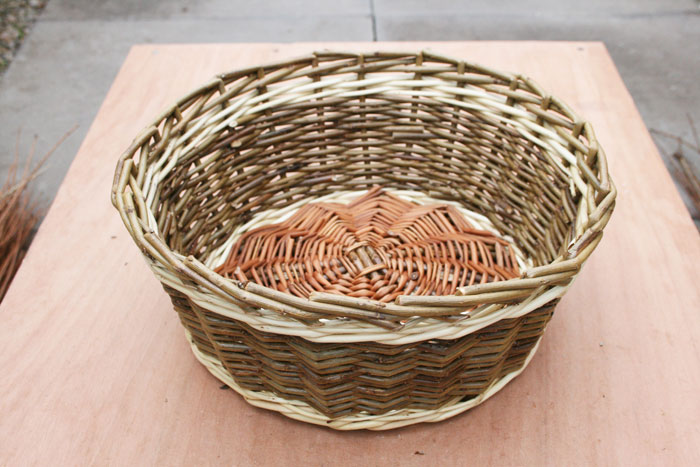
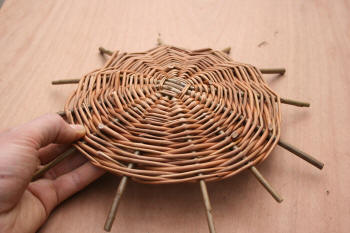
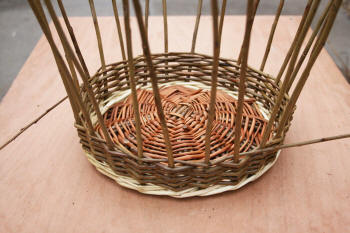
Base complete. If yours does not look like
this, that is totally normal for a first attempt; do not feel
hopeless. If you are not satisfied you could always weave another
now that you know how... |
|
| |
|
|
|
|
| |
|
|
|
|
| |
Stage 2 -
Staking Up |
|
|
|
| |
|
|
| |
|
|
| |
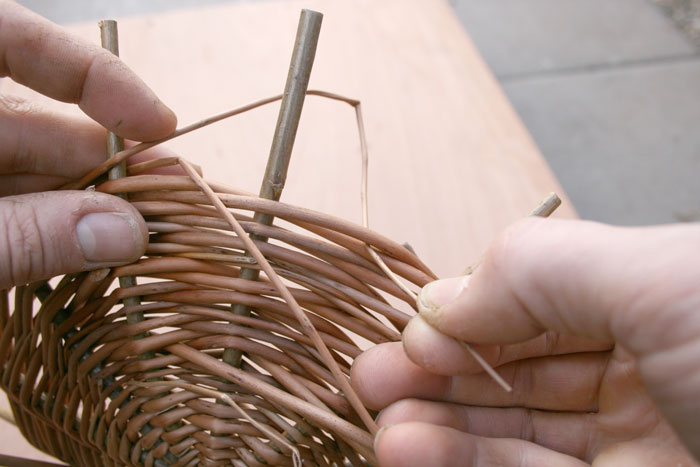
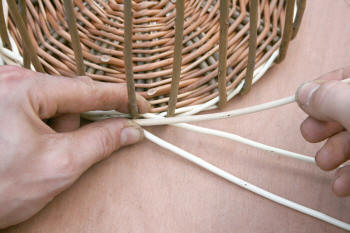
At this stage,
you now need to insert new rods into the weave of the base alongside
each spoke. These will then be turned up vertically, giving you
‘side stakes’ around which to weave. Use your medium-thick rods for
this. Remember, the stake material must always be thicker than the
weaving material.
|
|
| |
 |
|
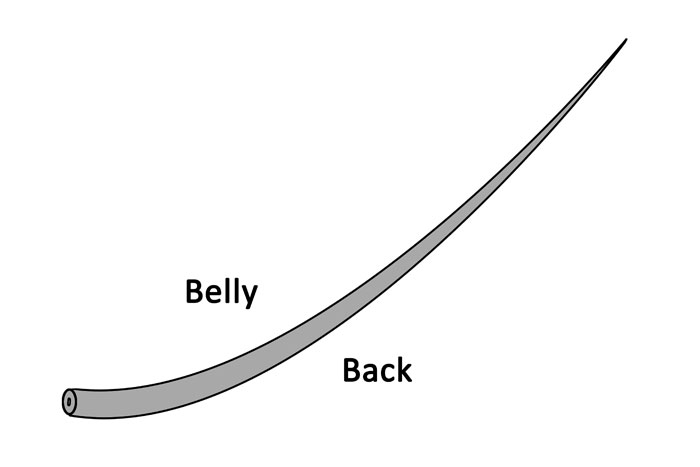
Before we start,
you should notice that each willow rod has a natural curve in it.
The outside of the curve is known as the ‘back’, and the inside is
the ‘belly’.
A basket of this size with spokes
spaced as they are will require two side stakes inserting next to
each spoke, a total of 24.
|
|
| |
|
|
|
|
| |
|
*Insight for future projects*
If there was
only one stake per spoke, the overall spacing of the side
stakes would be much wider. As a result, the weave on the
sides would be very loose. Too many stakes can also be a
problem. With you own projects in future, you will need to
carefully judge how many stakes a basket requires to achieve
a nice tight weave. It can often be the case that for
example, only a few of the spokes need to have two stakes
inserting next to them in order to tighten up the overall
spacing; the others needing only one. Note, no more than two
stakes can be inserted next to any one spoke. You will learn
more about all this in the projects to follow. |
|
|
| |
|
|
|
|
| |
 |
|
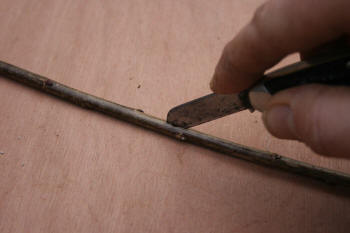
In order to
insert the stakes, you will need to ‘slype’ the butt end of each,
that means to make a long point. This can be done with a knife or a
skilful snip of the secateurs. The cut surface should be on either
the back or the belly, and not sideways. Be consistent. |
|
| |
|
|
|
|
| |
 |
|
While holding
the base with the concave side facing down (the underside), push the
bodkin deep into the weave beside a spoke as shown. Remove, and then
insert a stake belly side down into the weave as far as it will go.
Repeat on the other side of the spoke. In this way, insert two
stakes next to every spoke.
Inserting the stakes belly side down
means they will be bent up against their natural curve, which will
result in straighter sides. Note, Inserting the stakes back side up
instead, gives sides which bow out more like a bowl. |
|
| |
|
|
|
|
| |
 |
|
All the stakes
inserted. |
|
| |
|
|
|
|
| |
 |
|
The stakes are now bent up, known as
‘pricking up’. To do this, make a kink in each one slightly away
from the edge of the weave, about 5mm (3/16"), no further. Use your
thumb nail as shown. Let the rods relax back until you’ve kinked
them all, then bring them all up in one go. |
|
| |
|
|
|
|
| |
 |
|
 |
|
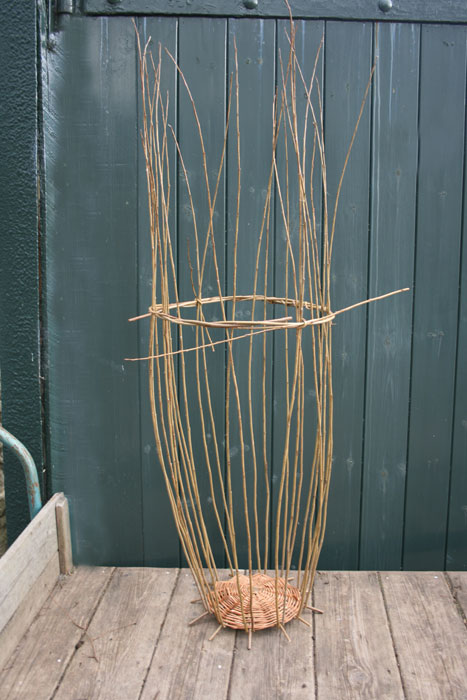
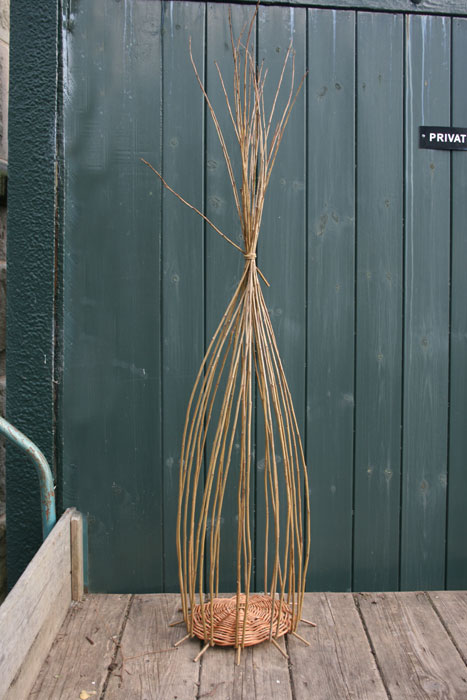
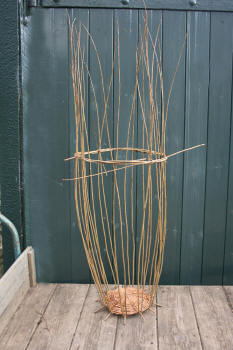
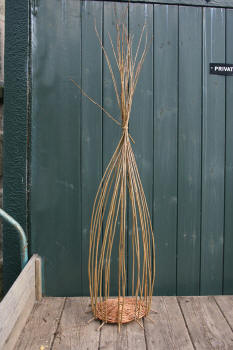
The stakes
are held up with either a hoop as pictured (which is tied in
place), or by simply tying them tightly together. If simply
tied, do this high enough that the stakes are not leaning
inwards. Also ensure they are not being held in a lopsided
manner. |
|
|
| |
|
|
|
|
| |
 |
|
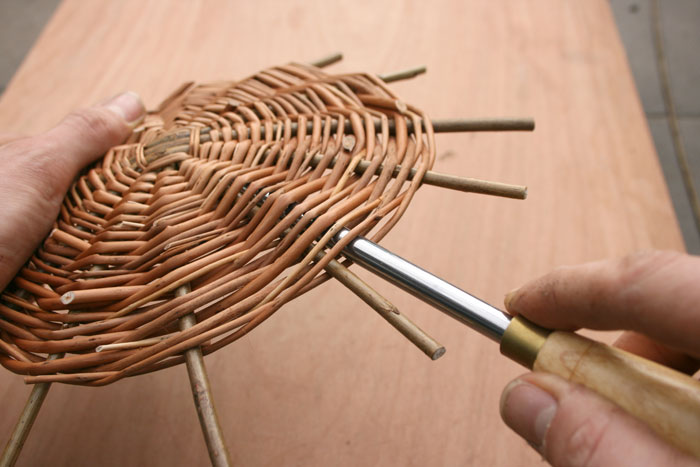
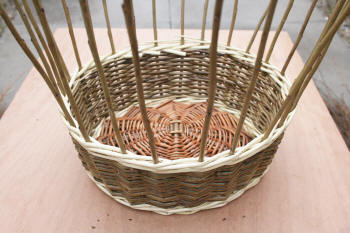
The base spokes
can now be trimmed back level with the edge of the weave, ensuring
that their ends are now further back than the turn-up of the stakes. |
|
| |
|
|
|
|
| |
|
|
|
|
| |
Stage 3 -
The Upsett |
|
|
|
| |
|
|
|
|
| |
 |
|
During
the ‘upsett’, a weave called ‘waling’ is used as a
transition between the base and the side. The main purpose
of this is to begin to secure the stakes upright and also to
space them more evenly.
The
method of ‘waling’ to follow involves weaving with three
rods; it is called a ‘3 rod wale’. Use your average
thickness weaving material for this.
To begin with, work with the
basket lying down on your lap as pictured. |
|
|
| |
|
|
|
|
| |
 |
|
1.
Take three similar rods and cut them to
the same length. Start with the tip ends. Insert them a couple of
inches deep (5cm) into the weave of the base on the left hand side
of three consecutive uprights, as shown. |
|
| |
|
|
|
|
| |
 |
|
Note, for the
first round, you will be weaving not on the side, but on the edge
between the base and the side.
2.
Begin by taking the leftmost rod over two
stakes, behind the next and out to the front, as shown. |
|
| |
|
|
|
|
| |
 |
|
3.
Now take the next leftmost rod and weave
it in the same manner; over two stakes, behind the next and out to
the front. |
|
| |
|
|
|
|
| |
 |
|
4.
Continue in this manner around the basket,
always weaving the next leftmost rod. Note, the rod in use must
always pass over the top of the other rods. |
|
| |
|
|
|
|
| |
See in the
photos how the uprights are starting to be spaced more evenly by
pulling and holding them in place while weaving around them.
Once you’ve gone
around the basket once, switch to working with the basket upright on
a flat surface such as a table. |
|
| |
|
|
|
|
| |
|
*KEY TECHNIQUE*
This
photo shows correct weaving technique. The rod is
brought across, pinched and held in place against
the stake, before being taken behind the next stake.
Note: avoid threading the end of the rod through the
stakes like a needle; that is hard work.
|
|
 |
|
|
|
| |
|
|
|
|
| |
 |
|
When you come to your ends,
leave at least some length on the outside as shown. Add new rods in
one by one starting with the left one as usual. The old end is
pulled back slightly and then the new rod is simply inserted
alongside as shown. Weave the new rod one stroke, before replacing
the next, and so on... Note, when inserting a new rod, the end must
go in far enough to be held behind the stake so that it can’t flick
back out once woven. |
|
| |
|
|
|
|
| |
Finish when the
rods come to their tip ends and the pattern cannot continue. Squash
the weave down to make sure it is firmly seated. Note, by both
starting and finishing the waling with tip ends, the pattern fades
nicely in and out. |
|
| |
|
|
|
|
| |
 |
|
All the ends are
cut off about half way between the stakes. |
|
| |
|
|
|
|
| |
|
|
|
|
| |
Stage 4 -
Weaving the Sides |
|
|
|
| |
|
|
|
|
| |
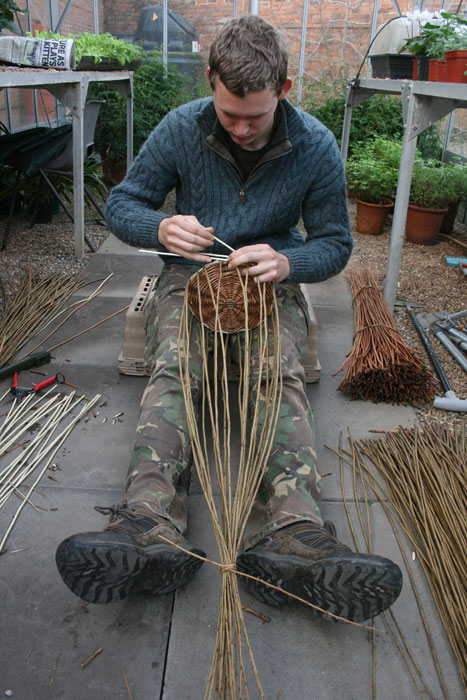
There are many
types of weave which can be used on the side of a basket. Being as
this is your first, it’s good to keep things simple and do a
‘randing’ weave. With randing, the weaver/s simply goes around the
stakes, in-front, then behind, in-front, then behind, and so on...
If you had an
odd number of stakes then you’d weave with just one rod going around
and around (obviously joining in new rods when necessary). However,
because you have an even number, two rods need to be used, one
‘chasing’ the other.
Before you
begin, place some kind of weight inside the basket, this will hold
it steady and give you more control. |
|
| |
|
|
|
|
| |
 |
|
Begin by placing
the butt end of a rod behind an upright, lying directly on top of
the wale. Now weave it simply around the stakes; in-front, behind,
in-front, behind. Do this for just a short distance. Now, the second
weaver is added in behind the stake previous to where the first
weaver started. Switch between weaving one weaver a little and then
the other. It is important that one does not overtake the other at
any point.
|
Remember to use good weaving technique as explained in the
precious 'key technique' box. Also, continue to work on
positioning the stakes evenly by holding them where you want
them to be while weaving around them. |
|
|
| |
|
|
|
|
| |
 |
|
When weavers run
out, add in new ones as shown. Join butts to butts and tips to tips.
Note, trim some off tip ends so as not to weave with incredibly thin
material. |
|
| |
|
|
|
|
| |
 |
|
By now the
stakes will most likely be supported. Undo the tie (or remove the
hoop). If they now lean too far out, re-tie temporarily.
Weave 3 1/2" (9 cm) high or a little
more if you wish. Firm down as you go. |
|
| |
|
|
|
|
| |
 |
|
When that’s
done, weave a band of three rod wale on top. Same method as for the
upsett, except the tip ends start simply resting behind the uprights
as shown. |
|
| |
|
|
|
|
| |
 |
|
Sides
complete...
Before moving on to weaving the
finishing border, ensure the weave is firmed down and level on top.
Push on the weave with your thumbs. |
|
| |
|
|
|
|
| |
|
|
|
|
| |
Stage 5 - The
Border |
|
|
|
| |
|
|
|
|
| |
To complete the
basket the upright stakes are turned down and woven into a border.
The kind detailed below is a ‘trac’ border. There are many possible
versions of this, you will be starting with a fairly simple one.
In preparation,
a kink needs to be made in each stake slightly higher than the top
of the weave. This ensures that each rod will bend at exactly the
right point when turned down. The space below the kink allows room
for woven rods underneath. |
|
| |
|
|
|
|
| |
 |
|
It is very
important that the kink is made at the correct height. In this
version, it is made at the height of three rod thicknesses. As a
measure, hold three rods (off-cuts as thick as stakes) on top of one
another, then bend a stake over them to the right as shown. Let the
stake stand back up again, then do the next, and so on... Take care
in getting them all the same. You may find it less fiddly to bend
them over something else of equal size. |
|
| |
|
|
|
|
| |
 |
|
Each stake is woven in the same manner. To
begin, take one down to the right in-front of two uprights, behind
the next, then out to the front as shown. |
|
| |
|
|
|
|
| |
 |
|
The next stake
to the right is then woven in the same manner, and so on...
Ensure each stake is fully down before
taking the next. |
|
| |
|
|
|
|
| |
 |
|
When only three
stakes remain upright, they continue to be taken in the same
pattern, except you’ll now need to thread them into place under the
already woven stakes where you started.
If you find it
difficult to see how they should be threaded, look back at a
complete portion and use it as your guide. Also remember that each
rod lies on top of the one before it. |
|
| |
|
|
|
|
| |
 |
|
When complete,
trim all the ends off with a slanted cut, making sure they still
rest on the outside against an upright. |
|
| |
|
|
|
|
| |
|
|
|
|
| |
Stage 5 -
Picking Off |
|
|
|
| |
|
|
|
|
| |
 |
|
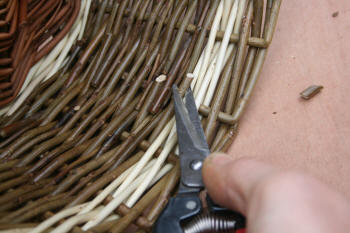
The last stage
is to trim off any other excess ends anywhere on the basket. This is
called ‘picking off’. Make slanted cuts so they lie as flush as
possible. Ensure they are not cut back too far, which would allow
them to flick out to the other side. |
|
| |
|
|
|
|
| |
|
|
|
|
| |
 |
|
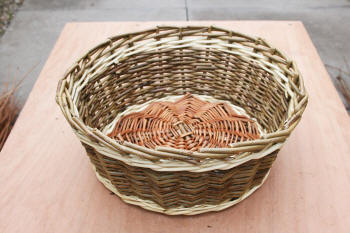
Congratulations on completing your first basket!
You covered some really fundamental
techniques and principles in this project. If you feel that you need
more practice to remember them, you may want to make a second
attempt. If you like, you could always use different types of willow
to spice things up a bit.
|
|
| |
|
|
|
|
| |
|
|
|
|
| |
|
The
project you have just finished is one of the many diverse
tutorials which feature in my book 'Willow Basketry: A
How-To Guide', available to purchase from Amazon, or in
eBook form on my website,
see here
for either.
|
 |
|
 |
|
|